You know those weekend mornings when you’re still in your pajamas, but you suddenly get the urge to make something that truly feels special? That’s me right now. We’re making pancakes — but not just any pancakes.
These are the true chef’s pancakes. I promise, you’ve never had fluffy, golden, buttery pancakes quite like these. They’re crispy around the edges, light in the middle, and so full of flavor that you’ll feel like a pro chef (even if you’re still half asleep in your PJs).
So grab your eggs, your flour, and let’s make the ultimate pancakes — the kind that’ll make you put your phone down and focus on creating breakfast perfection.
Ingredients
- 2 large eggs
- 2 additional egg yolks
- 2 tsp baking powder
- 2 tbsp sugar
- 1 tsp salt
- 2 cups all-purpose flour (divided)
- 1½ cups buttermilk (divided)
- 2 tbsp clarified butter (plus more for cooking)
- Additional clarified butter for pan frying
- For whipped cream topping:
- 1 cup heavy whipping cream (chilled)
- 2 tbsp sugar
- 1 tiny pinch of salt
- 1 tsp vanilla bean paste
- 1 tsp orange zest
- Optional toppings: Nutella, maple syrup, confectioner’s sugar, extra orange zest
Step-by-Step Method
Step 1: Start with the eggs
Crack two large eggs into a bowl. Add two additional egg yolks for that extra richness. Whisk them up until everything looks evenly combined — but don’t overmix. That’s one of the biggest mistakes people make at home when making pancakes. Overmixing leads to tough, chewy batter, and we want soft, tender chef’s pancakes.
Step 2: Add the baking powder, sugar, and salt
Sprinkle in your baking powder. I know, it’s quite a lot, but trust me, it works. Add sugar and salt next.
Then whisk it up again until it’s all well mixed. You’ll notice the texture becoming a little foamy and lighter in color — that’s the baking powder doing its magic. It’s creating those tiny air pockets that’ll make your pancakes wonderfully fluffy. Let it sit for a moment; you might even see it expand slightly — that’s a good sign.
Step 3: Mix in half your dry and wet ingredients
Add half of your flour and half of your buttermilk to the bowl. Use a wooden spoon this time — not a whisk. Gently fold and mix until it’s just combined enough to add the rest. You’ll notice some of those air bubbles deflating a bit — that’s okay. We want fluffy pancakes, not overly puffed ones that collapse later.
Step 4: Add the remaining flour and buttermilk
Now fold in the rest of both. Doing this in batches helps prevent overmixing. You’ll get pancakes that are more tender, smooth, and soft. If you look closely, your batter should be thick but pourable — and you might see a few clumps.
Don’t worry about them. Clumps are good. They mean you haven’t overworked the batter, and once you cook them, they’ll disappear completely.
Step 5: Add clarified butter
Pour in a splash of clarified butter and barely mix it through the batter. This tiny touch gives our pancakes that rich, buttery flavor while keeping everything smooth. Batter with small clumps and streaks of flour? Perfect. That’s how you know it’s ready.
Step 6: Prep your pancake zone
Move over to the stove. Set your oven to 250°F and line a sheet tray with a wire rack. This will keep your cooked pancakes warm while you work through the rest of the batch.
Step 7: Heat your pan and butter it up
Grab a cast iron pan or griddle and spread clarified butter all across it. This gives us all that buttery flavor without any burning milk solids. Use more butter than you think — seriously. Get into those little nooks and crannies at the bottom of the pan.
When you splash a few drops of water, listen for a strong crackle — that’s your cue the pan’s ready.
Step 8: Cook the first pancake
Let’s pour on the first test pancake. Keep your temperature between medium and medium-low at all times. Control the heat consciously. If you see or smell burning, turn it down.
As the pancake cooks, watch the edges firm up and look for air bubbles breaking on top. Once those bubbles pop and the edges look set, it’s close to flipping time.
Step 9: Treat it like a steak
Yes, really. Think of this pancake like a fancy $3,040 steak. You want an even golden-brown crust on the bottom. Peek under the edges to check. And crucial safety note — always flip away from you, never toward you (especially with all that butter).
If you notice dry spots on the pan, fill them in with more clarified butter right away.
Step 10: Patience = beauty
That butter creates the most beautiful golden crust, almost like searing a steak. Don’t rush. Stay focused — no checking your phone. You’re in full chef mode now. Once done, transfer the pancake to the oven tray to stay warm, brush away any burnt bits, add more clarified butter, and keep going until all your batter’s used up.
Step 11: Whip the dream topping
Now for my favorite part — the whipped cream. Chill your bowl and whisk attachment beforehand (this makes a huge difference). Pour in the heavy cream and whisk until it starts forming soft peaks. Add a sprinkle of sugar, a pinch of salt, and vanilla bean paste.
Then whisk again until soft and droopy — not stiff. Finally, fold in some orange zest. It adds the most beautiful color and flavor. Be gentle; you don’t want the citrus to curdle the cream. This is my secret since childhood — that little orange note brings the whole thing alive.
Step 12: Time to plate
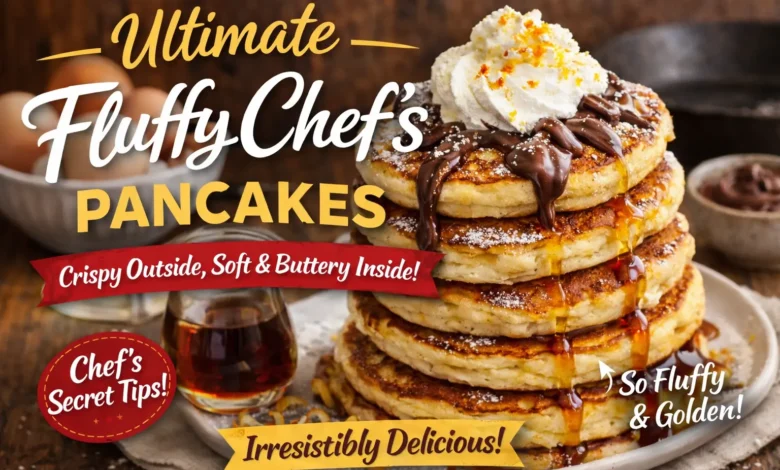
Stack five of those golden beauties high. Drizzle Nutella all over, spoon on your whipped cream (let it droop dramatically over the sides — it’s allowed!), then sprinkle extra orange zest and a dusting of confectioner’s sugar. Go wild with maple syrup if you want — I know I did as a kid. It’s messy, nostalgic, and perfect.
Step 13: The best bite ever
Take your fork and listen — that crisp sound as you cut in is everything. Crispy outside, fluffy inside, creamy topping, a hint of citrus — the perfect bite. Mhm. Wow. Better than I thought they would be.
Serving Tips + Variations
- Keep finished pancakes warm in a 250°F oven until serving.
- Try adding blueberries or chocolate chips into the batter for a twist.
- The orange zest in the whipped cream pairs beautifully with Nutella or maple syrup.
Now you’ve got everything you need to make the ultimate pancakes — the kind you’ll want to eat straight from the pan, pajama-style. Don’t let the comfort fool you; these chef’s pancakes demand focus, patience, and love. But once you take that first buttery, crispy, fluffy bite, you’ll know it was all worth it.
Quick FAQ
Why use clarified butter instead of regular butter?
Clarified butter gives you that rich flavor but won’t burn at high heat. It’s key for getting those golden edges.
Can I make the batter ahead?
It’s best fresh. If you rest it too long, the baking powder loses its lift — and we want those super fluffy chef’s pancakes.
What if I don’t have buttermilk?
You can make a quick version by mixing 1½ cups milk with 1½ tbsp lemon juice or vinegar and letting it sit for 5 minutes.